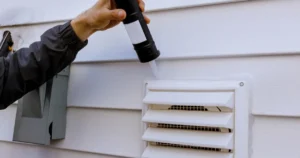
 If you’ve ever peeked behind your dryer and wondered about that little vent cover, you’re not alone. Many homeowners overlook this small but mighty component until something goes wrong—like a sky-high energy bill or a surprise visit from a neighborhood critter! Replacing your dryer vent cover might sound like a straightforward weekend project, but there are a few common blunders that can cost you big in the long run. In this article, we’ll chat about the most important mistakes to avoid during dryer vent cover replacement, so your dryer stays safe, efficient, and wallet-friendly for years to come. Dryer Vent Cover Replacement
Why Replacing Your Dryer Vent Cover Matters More Than You Think
A damaged or outdated vent cover doesn’t just look rough—it can lead to a pile of problems. Moisture leaks, pest invasions, lint build-up, and even fire risks all creep in when that cover isn’t doing its job. Proper venting is essential for your dryer’s efficiency and your home’s safety. Plus, energy-saving dryer vent covers can help you keep those utility bills in check. Whether you’re a first-timer or seasoned DIYer, knowing what to avoid is the best way to make this project a success.
Common Mistakes That Can Cost You Over Time
- Choosing the Wrong Size or Type: Not all vent covers are created equal! Using a mismatched cover can cause airflow problems or let in unwanted guests. Always double-check your duct size before buying, and pick a cover made for exterior use.
- Skipping the Seal: Leaving gaps between the vent and your wall is an open invitation for moisture, pests, and drafts. Always use high-quality caulk or weather-resistant sealant to keep the elements out and your utility bills low.
- Ignoring Lint Buildup: Replacing the cover is the perfect time to clean out lint from the vent pipe. Lint not only reduces efficiency but is also a major fire hazard. Add this step to your to-do list every time you think about the vent.
- Forgetting About Accessibility: Some vent covers look sleek but make it tough to check or clean the vent in the future. Pick a design that’s easy to open or remove, so routine maintenance doesn’t become a chore.
Key Features & Cost: What to Consider Before Buying
Shopping for a new dryer vent cover? Here’s a quick table to break down what matters most—whether you’re aiming for energy efficiency, safety, or just saving a few bucks. Remember, investing in the right cover now can prevent expensive repairs and keep your dryer running smoothly.
| Feature | Why It Matters | Estimated Cost Range |
|---|---|---|
| Material (Plastic vs. Metal) | Metal covers generally last longer and resist weather damage better than plastic options. | $12–$35 |
| Backdraft Damper | Prevents cold air or pests from entering your home when the dryer isn’t running. | $15–$40 |
| Easy-Access Design | Makes cleaning and inspections a breeze, reducing fire risk. | $18–$45 |
| Certified for Safety | UL-listed or similar certification ensures the product meets safety standards. | $15–$50 |
Safety First: How to Protect Your Home & Family
Safety should never take a backseat when updating anything related to your appliances. Always turn off the dryer and unplug it before starting. Check for sharp edges on the old vent cover, and wear gloves to avoid cuts. After installation, test your dryer for proper airflow and keep an eye out for any drafts or leaks. If you notice anything odd, it may be time to call in a professional. And don’t forget—routine vent cleaning is just as important as the replacement itself!
What If Things Go Wrong? Emergency Services & When to Call a Pro
Sometimes, even the best-laid plans go sideways. If you notice a burning smell, persistent moisture around the vent, or your dryer isn’t drying clothes like it used to, don’t try to fix it all yourself. Emergency vent cleaning or repair services are worth every penny, especially when it comes to preventing fire hazards. Many local HVAC technicians offer same-day help to get your laundry room back to normal quickly and safely.
Q: How often should I replace or inspect my dryer vent cover?
A: For most homes, a quick inspection every 6–12 months is enough. Look for visible cracks, loose fittings, or lint buildup. If your cover is damaged or not sealing properly, swap it out right away. Regular checks will keep your dryer efficient and help avoid surprise repairs.
Conclusion: A Small Fix That Pays Off
Replacing your dryer vent cover might not seem like a big deal, but avoiding these common mistakes can save you from headaches, high bills, and even dangerous situations. Invest in the right cover, seal it well, keep it clean, and never ignore safety. If in doubt, don’t hesitate to reach out for emergency services. With a little care, your laundry routine will stay smooth—and your home safe—for years to come.
Read more: Citrus Heights Dryer Vent Cleaning