 If you’ve ever stared up at your fireplace and wondered about the mysterious workings inside your chimney, you’re not alone. The humble chimney liner plays a huge role in keeping your home safe, energy-efficient, and up to code. Whether you’re a DIY enthusiast or just looking to keep your chimney costs down, installing a chimney liner yourself is a project you can definitely tackle with a bit of patience and the right plan. Here’s how to get started, plus why a chimney liner is a smart investment for your home.
Why Chimney Liners Matter: Safety and Savings
Before we jump into the how-to, let’s talk about why chimney liners are so important. A quality liner protects your masonry from heat and corrosive byproducts, keeping dangerous gases like carbon monoxide out of your living space. It also boosts your fireplace’s efficiency and helps prevent costly repairs down the line. Even if you have a wood stove or gas insert, a chimney liner ensures your system meets modern safety standards.
“A well-installed chimney liner is like a safety net for your home—protecting your investment, your family, and your peace of mind.”
Key Features, Safety, and Emergency Services
| Key Feature | Why It Matters | Estimated Cost |
|---|---|---|
| Durable Stainless Steel Liner | Resists rust, lasts decades, safe for all fuel types | $400–$900 |
| Insulation Wrap | Improves draft, reduces creosote, adds fire protection | $70–$140 |
| Proper Sizing | Ensures efficient venting, prevents smoke backup | Included with most kits |
| Professional Emergency Services | Fast help for chimney fires, blockages, or liner damage | $100–$300 (per visit) |
Remember, installing a chimney liner isn’t just about saving cash—it’s also about protecting what matters most. If you ever notice smoke in your home or suspect a blockage, don’t hesitate to call emergency chimney services. Safety always comes first!
Getting Ready: Tools, Materials, and LSI Keyword
First, gather the essentials. Most DIY chimney liner kits come with a flexible stainless steel liner, cap, top plate, and connector. You’ll also need a sturdy ladder, work gloves, a drill, tin snips, and some wire brushes for cleaning. If you’re aiming for the best performance, pick up an insulation wrap to help your new liner handle high temperatures and prevent heat loss.
- Flexible stainless steel chimney liner kit (with rain cap and top plate)
- Insulation wrap and mesh
- Heavy-duty work gloves
- Wire brush and chimney cleaning brush
- Drill and masonry bit
- Rope and duct tape
- Tin snips
- LSI Keyword: chimney flue installation
Pro tip: Always double-check your liner size by measuring your chimney’s interior width and height. An undersized liner can cause draft problems, while an oversized one won’t vent efficiently.
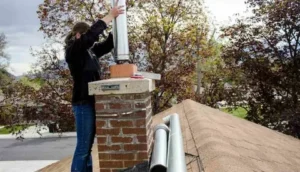
Step-by-Step: How to Install a Chimney Liner
- Clean the Chimney: Start by thoroughly sweeping out soot, debris, and any old liner remnants using a wire brush. A clean chimney is key to a safe, smooth installation.
- Measure and Prep the Liner: Measure the full length of your chimney from the top to the appliance connection (often at the fireplace or stove). Cut your liner to size using tin snips. If you’re using insulation, wrap the liner according to the kit’s instructions and secure it with mesh and tape.
- Lower the Liner: With a helper on the roof (safety harness highly recommended), gently feed the flexible liner down the flue. Attach a rope to the bottom of the liner for extra control. Go slow and avoid kinking or twisting.
- Connect and Secure: Once the liner reaches the bottom, connect it to your stove pipe or fireplace insert with the provided adapter. At the top, secure the liner to the chimney with the top plate and rain cap. Tighten all hardware for a snug, weatherproof fit.
- Test and Inspect: Light a small fire or run your appliance to check for proper draft and venting. Watch for smoke leaks or odd smells—if anything seems off, investigate before regular use.
Safety reminder: If you’re unsure about any step, or your chimney is unusually tall or narrow, consider bringing in a professional. Certain local codes may also require a certified installer for insurance purposes.
Emergency Services: When to Call the Pros
Even the best DIY jobs sometimes need backup. If you notice smoke backing up into your house, hear strange noises from your chimney liner, or suspect a fire inside the flue, don’t wait. Call a certified chimney sweep or emergency chimney service. Fast action protects your home and your family.
Conclusion: Safe, Warm, and Cost-Effective
Installing a chimney liner yourself can be a rewarding project that saves you hundreds—if not thousands—over the years. It’s a direct way to boost your chimney’s safety, efficiency, and lifespan while keeping costs low. Always prioritize safety, use high-quality materials, and don’t hesitate to call for help if you hit a snag. Remember, a little effort now means cozy fires and peace of mind for years to come.
Read More: Fort Worth Chimney Sweep