Introduction to the Goechala Trek
If you’re planning the Goechala trek, you’re in for something incredible. Nestled deep in the heart of Sikkim, this trail isn’t just about mountains—it’s about raw, untouched beauty. At around 16,200 feet, the Goechala pass gives you those postcard views of Kanchenjunga that honestly feel surreal in person. But before you get carried away by the excitement, let’s get one thing straight—this trek demands preparation.
I did this trek with a small group organized by a reliable local outfit. I found them through a friend who’d done several treks across the Himalayas. The group was well-managed, the guides knew every twist of the trail, and they made sure we weren’t just hiking—but understanding and respecting the land we were walking on. More on that later, but for now, let’s focus on what you really need to pack.
Where is Goechala?
Goechala is located in Sikkim, India’s Kanchenjunga National Park in the eastern Himalayas. The trek usually starts from a small village called Yuksom, which feels like you’ve stepped into a different world. It’s quiet, green, and surrounded by misty hills. From there, it’s a journey through dense forests, alpine meadows, and eventually, barren high-altitude terrain with clear views of the mighty Kanchenjunga range.
What Makes Goechala a Must-Do Trek?
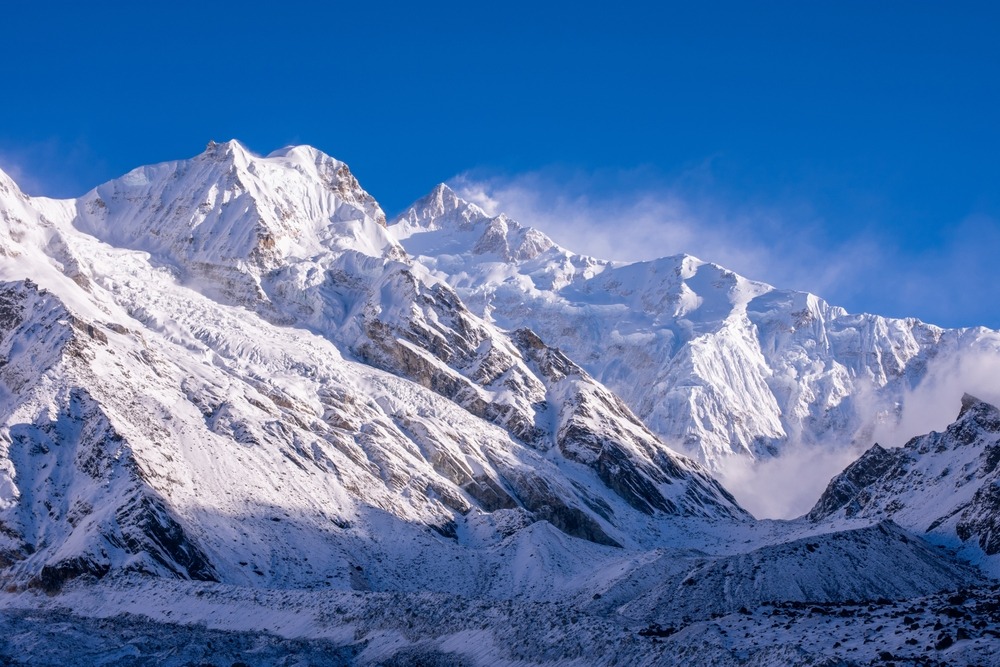
It’s not just another Himalayan trek. Goechala offers one of the best views of Kanchenjunga, the world’s third-highest mountain. But that’s not all. You pass through rhododendron forests, see monasteries nestled in remote villages, and walk alongside rivers that sound like nature’s lullaby at night.
It’s also a quieter trail—less commercialized compared to others like Roopkund or Kedarkantha. And that’s what drew me to it. I didn’t want crowds or phone signals—I wanted peace, and this trail delivered. There’s a moment, just before sunrise at Dzongri top, when everything around you glows orange and pink. No picture can ever fully capture it.
Trek Difficulty and Duration
How Tough is the Goechala Trek?
Let’s not sugarcoat it—this is a challenging trek. It’s not technical, but the altitude, cold, and daily ascents test your stamina. You’re hiking 8–10 km a day on average, and there are days when the oxygen levels dip noticeably. I’d rank it as moderately difficult, but that also depends on your fitness. If you’ve done a few hikes before, and you’re comfortable carrying a backpack and walking 6-8 hours a day, you’ll be okay.
I trained for a month before the trek—morning jogs, squats, and basic cardio. That helped a lot, especially on the steep climbs after Tshoka. Take altitude seriously. A fellow trekker in my group didn’t hydrate enough and had to stop halfway due to symptoms of AMS (Acute Mountain Sickness). Don’t be that person. Drink water, take it slow, and listen to your body.
How Many Days Does the Trek Take?
The standard itinerary is 10 to 11 days, including acclimatization and return. Here’s a quick breakdown:
-
Day 1: Arrive at Yuksom
-
Day 2: Yuksom to Sachen
-
Day 3: Sachen to Tshoka
-
Day 4: Tshoka to Dzongri
-
Day 5: Acclimatization at Dzongri
-
Day 6: Dzongri to Thansing
-
Day 7: Thansing to Lamuney
-
Day 8: Lamuney to Goechala Viewpoint 1, then back to Thansing
-
Day 9: Thansing to Tshoka
-
Day 10: Tshoka to Yuksom
Some groups include an extra day for buffer or rest, depending on weather. I went with a local trekking company that spaced things out nicely and didn’t rush the trail. Their slow pace helped everyone adjust better to the altitude.
Understanding the Weather and Terrain
Climate Conditions During Different Seasons
April through mid-June and late September through early November are the two peak hiking seasons. I went in October. The skies were crystal clear, nights were cold, and mornings were magical. However, after Dzongri, the temperature falls below freezing, so don’t be fooled by the sunny days.
April and May bring blooming rhododendrons, but expect occasional rain. Monsoon is a no-go—the trail becomes slippery, and landslides are common. Winter treks aren’t allowed due to heavy snow beyond Dzongri.
Here’s a rough idea of the temperatures I experienced:
-
Yuksom: 10–20°C (day), 4–10°C (night)
-
Dzongri: 5–10°C (day), -5 to -10°C (night)
-
Lamuney/Goechala: -5 to -15°C at night
Layering is key. I’ll explain how I handled that in the next section.
Trail Characteristics and Elevation Profile
The trail climbs gradually at first—through forests and wooden bridges. But it turns steep after Bakhim. From Tshoka onward, the altitude becomes noticeable. Dzongri is where many feel the first real signs of fatigue. Then comes the open landscape, fewer trees, and more wind.
Expect everything from damp forest trails to rocky paths to icy wind near Goechala. My trekking shoes were my best investment—high-ankle, waterproof, and had solid grip. Don’t go cheap on footwear.
Essential Documents to Carry
Permits Required for the Goechala Trek
You’ll need several permits:
-
Inner Line Permit (ILP) – Mandatory for all non-Sikkimese Indians and foreigners.
-
Kanchenjunga National Park Permit – Required to enter the park.
-
Trekking Permit from Sikkim Tourism Office – Usually handled by your trek operator.
Thankfully, the company I joined arranged all this beforehand. I just had to submit a few ID scans and passport-size photos.
ID Proofs and Travel Itinerary
Carry original and multiple photocopies of:
-
Aadhar card (for Indian citizens)
-
Passport and visa (for foreigners)
-
Passport-size photos (4–5)
-
Printout of your booking confirmation
-
Emergency contact info
Keep all these in a waterproof ziplock. I carried mine in my daypack and never had to fumble during check-ins.
Clothing Checklist for Goechala Trek
Layering Strategy for Changing Weather
Here’s my golden rule: 3 layers minimum—Base, Insulation, and Outer.
-
Base layer: Think dry-fit. No cotton. Wicks sweat.
-
Insulation layer: Fleece or lightweight down jacket.
-
Outer shell: Waterproof and windproof jacket.
I’d add a fourth if it gets really cold—like a thick down jacket at Dzongri or Lamuney.
Recommended Clothing Items and Quantities
This is exactly what I packed and used:
-
3 quick-dry t-shirts
-
2 thermal base layers (top + bottom)
-
1 fleece jacket
-
1 down jacket (lightweight, compressible)
-
1 waterproof shell jacket
-
2 trek pants (quick-dry)
-
1 thermal bottom
-
1 rain poncho or jacket
-
2 pairs gloves (1 fleece, 1 waterproof)
-
1 wool cap + 1 sun cap
-
3–4 pairs of socks (1 woolen for nights)
-
1 pair of good trekking shoes (high ankle)
-
1 pair of slippers (for campsites)
Every night, I changed into thermals and layered up with fleece + down. It kept me warm even when the mercury dropped below -10°C.
Backpack and Packing Strategy
Choosing the Right Backpack for Goechala
Your backpack is your travel buddy—it better be reliable. I went with a 50-liter trekking backpack with an internal frame and padded shoulder straps. It had a rain cover (super important), and compartments to organize everything without turning it into a black hole.
Make sure your backpack has:
-
Chest and hip straps for weight distribution
-
A dedicated section for hydration bladder or water bottles
-
Compression straps to tighten the load
I also carried a 15-liter daypack for essentials like snacks, water, gloves, a headlamp, and my camera. Some trekking groups arrange for porters or pack animals, but I preferred carrying my gear—it gave me more flexibility and peace of mind.
How I Packed My Bag for Goechala
Packing smart means two things: weight distribution and access.
-
Bottom section: Sleeping clothes, thermals, and night gear
-
Middle: Heaviest items like down jacket, toiletries, and food
-
Top: Items you might need during the day—windcheater, snacks, first-aid
-
Side pockets: Water bottle on one side, poncho or gloves on the other
-
Lid pocket: ID cards, permits, cash, and headlamp
Use packing cubes or plastic bags to separate wet/dirty clothes. Trust me, this saved me from digging around in freezing cold mornings.
Footwear and Accessories
Trekking Shoes That Work on Goechala
Don’t mess around here. You need high-ankle trekking boots with solid grip and waterproofing. I used Quechua Trek 100 boots—they didn’t give me a single blister and handled mud, rock, and snow effortlessly. Break them in before the trek; wear them for walks or weekend hikes.
Bring one pair of camp slippers too. After long hikes, removing your boots and slipping into something light is heaven.
Accessories You Shouldn’t Forget
-
Gaiters (if there’s snow)
-
Microspikes (only needed if there’s fresh snow at high altitudes)
-
Headlamp (with spare batteries—must-have)
-
Trekking poles (saves knees on descents)
-
Sunglasses (with UV protection)
-
Woolen cap and buff (wind can be brutal)
-
Waterproof gloves (don’t rely on fleece alone)
These seem like small items, but up in the mountains, the smallest things matter most.
Sleeping Essentials
How I Stayed Warm at Night
Nights after Dzongri are no joke—temperatures fall below freezing. My sleeping bag was rated for -10°C, and I added a fleece liner inside it for extra warmth. If your trekking company provides sleeping bags, check their ratings and bring a liner just in case.
At campsites, I wore thermals, a fleece, wool socks, and a beanie to bed. I also used a hot water bottle on colder nights—filled it up after dinner and tucked it in the bag. Game changer.
Other Sleeping Gear
-
Inflatable pillow (optional but comfy)
-
Earplugs (for snorers in the group)
-
Eye mask (if you’re light sensitive)
If you’re someone who struggles with sleep in unfamiliar places, carry what comforts you—tea bags, a familiar scarf, or a book.
Toiletries and Hygiene Kit
Keeping Clean on the Trail
Let’s be honest: you won’t shower much. Water is cold, and campsites don’t always have facilities. But that doesn’t mean you can’t stay clean.
Here’s my minimalist hygiene kit:
-
Biodegradable wet wipes (life-saver)
-
Toothbrush + paste
-
Hand sanitizer (plenty!)
-
Sunscreen (SPF 50 or more)
-
Lip balm with SPF
-
Toilet paper (in a ziplock)
-
Quick-dry towel
-
Face wash or soap sheets (biodegradable)
Most people skip deodorant—your sweat glands won’t be the priority. Just clean up with wipes at the end of the day.
Toilet Setup in the Wild
Most camps have basic toilet tents or eco-friendly pit toilets. But carry a small poop kit:
-
Small trowel (optional)
-
Toilet paper
-
Hand sanitizer
-
Ziplock for used wipes (don’t litter)
-
Soap or soap sheets
Ladies—carry pee funnels or urination devices if you prefer not to squat. Also, pack sanitary products in a waterproof bag along with disposal bags.
Food, Snacks, and Hydration
What to Eat on the Trek
Most guided treks, like the one I joined, include all meals—hot breakfast, packed lunch, soup, dinner. The food was basic but warm and filling: rice, dal, sabzi, khichdi, noodles, and eggs.
Still, I brought my own snack kit:
-
Dry fruits (almonds, dates, raisins)
-
Energy bars
-
Dark chocolate
-
Peanut butter sachets
-
ORS (electrolyte packs)
These saved me on long ascents, especially when we had early starts. Don’t overpack snacks, just enough for a week.
Staying Hydrated
Carry two 1-liter bottles or a hydration bladder. You’ll need at least 3–4 liters daily. Mountain water is fresh, but I still used chlorine tablets or Steripen to purify it.
Pro tip: Mix electrolyte in one bottle and keep the other for plain water.
First-Aid and Medicines
Personal Medical Kit for Goechala
Even with a guide, you need your own first-aid kit. I kept mine compact but covered the essentials. The trail is remote—there’s no medical help for miles. One slip or stomach bug can ruin your trek if you’re not prepared.
Here’s what I carried:
-
Diamox (for altitude sickness – only take after medical advice)
-
Paracetamol / Ibuprofen
-
Antacid tablets
-
Anti-diarrhea medicine (Loperamide)
-
Oral Rehydration Salts (ORS)
-
Band-aids and blister patches
-
Crepe bandage
-
Antiseptic cream
-
Pain-relief spray
-
Cold and cough tablets
-
Personal prescription meds
I also added a small tube of Dettol and a few gauze pads. Keep everything in a ziplock or waterproof pouch. If you have asthma, diabetes, or any chronic condition—don’t just pack meds, inform your trek leader about it too.
Tech and Electronics
Gadgets That Actually Help
You won’t get much cell reception after Yuksom, and you shouldn’t expect power sockets at campsites. Go minimal.
What I carried:
-
Power bank (10,000–20,000 mAh) – essential for phone and headlamp
-
Headlamp (with extra batteries) – hands-free lighting is a must
-
Camera (optional) – I used my phone mostly
-
Watch with altimeter (optional but useful)
Your phone won’t be for scrolling—use it for maps, offline notes, or journaling. I also downloaded offline Google Maps and trail guides before the trek. My trekking company (The Searching Souls) provided a local guide who had everything memorized, but I liked checking progress myself.
If you’re into photography, a GoPro or lightweight DSLR could be fun—but only if you can carry it without hassle.
Cash, Connectivity, and Communication
Managing Money on the Trail
Once you leave Yuksom, there are no ATMs or mobile wallets in the mountains. Everything is cash-based. Bring enough to cover:
-
Personal snacks and tips
-
Small purchases at tea huts (Maggi, tea, etc.)
-
Emergency expenses
I carried ₹3,000 in small denominations and used less than half. Tips were pooled in our group for the porters and guides at the end—it felt right, considering how hard they work.
Phone Networks and Offline Backup
-
BSNL and Jio had the best coverage in Yuksom
-
Zero signal from Day 2 onward
-
Inform family you’ll be out of contact for 8–9 days
Download everything offline—music, ebooks, maps, even your permits. I kept my ID scans on my phone and in the cloud, just in case.
Optional but Useful Gear
Things That Made My Trek Easier
There are items I didn’t think I’d need—but was grateful for every single day.
-
Foldable mug – for tea breaks on the go
-
Notebook + pen – jotting thoughts, tracking weather
-
Small duct tape – for shoe repairs or leaks
-
Mini carabiners – for drying socks or hanging gear
-
Cloth bag – for separating dirty clothes
-
Tiny sewing kit – for emergency fixes
You don’t need these, but if you have room, they’re worth tossing in. I saw people using safety pins, garbage bags, even a piece of string as a clothesline. Improvisation is the name of the game, but being prepared just feels better.
Group or Solo – What’s Better?
Why I Chose a Guided Group
Goechala Pass is not a trek I’d recommend doing solo unless you’re ultra-experienced in high-altitude trekking. The trail is long, weather unpredictable, and navigation tricky in certain parts. I went with a small, well-organized trekking company—just eight of us, plus two guides, a cook, and porters. It wasn’t a huge corporate group, just a local team that’s been on this trail for years.
They handled permits, food, tents, and kept us safe during a sudden snowstorm past Lamuney. What stood out? They didn’t rush. Every day felt balanced between challenge and rest. They even carried extra oxygen and knew how to handle AMS. If you’re unsure who to go with, I’d recommend doing some research on local outfits with solid reviews instead of picking a flashy ad. Personal referrals are gold.
Final Thoughts – My Goechala Trek Experience
Packing for Goechala isn’t just about stuffing a bag with gear—it’s about preparing yourself for one of the most rewarding journeys in the Indian Himalayas. Every item in my backpack had its moment, whether it was my headlamp during those dark, icy mornings or my fleece gloves when the wind hit hard past Dzongri. I didn’t pack for Instagram; I packed to survive, stay warm, and soak in every second.
One last piece of advice—don’t overpack, but don’t underprepare either. Respect the altitude, respect the trail, and respect your body. This trek isn’t about speed; it’s about pacing yourself, acclimatizing right, and enjoying the silence that only 16,000 feet can offer.
And if you’re unsure about logistics, permits, or planning, I really suggest going with a small, experienced trekking group. I joined a team led by a local guide service with years of experience on the Goechala trail. They weren’t a big-name operator, which I liked. They kept things intimate and focused—like trekking with friends who just happened to know the mountains better than you. You can usually find reliable teams by reading honest trekker reviews or through personal referrals.
At the end of it, I didn’t just bring back photos—I brought back clarity, resilience, and the kind of stories that stay with you forever. If Goechala is on your list, start training, start packing, and just go. You won’t regret it.
FAQs About the Goechala Trek
1. How cold does it really get on the Goechala Trek?
Very cold, especially post-Dzongri. Night temperatures can drop to -10°C or even lower near Lamuney. Make sure your sleeping bag is rated for sub-zero, and always layer up before bed.
2. Can beginners do the Goechala Trek?
Yes, but only if you’re reasonably fit and prepare well. It’s not technical, but the altitude and long walking hours can be tough. Start training 4–6 weeks before with cardio and endurance exercises.
3. What is the best time to do the Goechala Trek?
The two best windows are April–mid-June and late September–early November. I went in October and had crisp skies and no rain. Avoid the monsoon months—landslides and slippery trails make it risky.
4. Do I need to carry my own tent and food?
Not if you’re with a guided group. Most good trekking companies arrange all logistics—tents, food, permits, and even carry extra oxygen. If going solo, you’ll need to handle everything, including navigating.
5. Is there any mobile network or charging point available during the trek?
Network fades out after Yuksom, and there are no charging points after Day 1. Bring a fully charged power bank, and inform your family that you’ll be off-grid for the entire duration of the trek.